Saturday, April 28, 2012

Recycled Jeans and top

Pin It

 I teach sewing classes at JoAnn's, and one complaint I've heard from customers is that they spend a ot on fabric, only to screw it up when they are first learning to sew.   So I suggest that they look for other sources of fabric - its cheap, and a great way to recycle and practice ideas.   

Project Run and Play's week 3 challenge was an Earth Day challenge, so I used that as my inspiration.   Sometimes upcycled fabric can work for a final project too, and produce some cute, earth friendly results! 


This outfit was made from: a large yellow men's shirt ($0.50), a medium green shirt ($1), and a pair of jeans ($1).  Also a few scraps from my endless supply of scrap fabric, 4 buttons, a zipper, and a piece of ribbon.  


Here it is!


The back of the shirt has an applique of three little green flowers, made from scraps.  I just cut out some random circles, layered them and stitched around and around in a circle from the center out.   The stems are a satin stitch and the leaves are reverse applique, made with leftovers from the green shirt (more of those on the sleeve and hood)


I'm very happy with the jeans.  the color variation just comes from using different bits of the fabric that came from the original jeans.  They were a large adult size, so plenty of fabric for a 2/3T pair of jeans.  I used turquoise top stitching and button, and added a stitched recycle symbol.  The zipper is bright lime green, just because.


The back pockets were cut from the pocket on the original jeans, to keep the top hem.   One is embellished with a bit of ribbon stitched on, an easy way to add a distinctive touch without much work.   The stitching on the other pocket (TLSS, for "The Little Sewing Shop").  Its done in the same way as the recycle symbol, with a triple stitch. 


More ribbon embellishments.  I changed up the basic jeans patten by adding a bit of flare.   I just added triangular panels, but before I did, I sewed on some ribbon!

So as you can see, $2.50 worth of thrifted clothing, makes a pair of designer jeans that are one of a kind, and a fun top to go with it!

Pin It

Tuesday, April 24, 2012

Mmmmm.... cake.... and an Australia Outfit

Pin It
I've been taking a cake decorating class at JoAnns.  I'm much better at sewing than cake, but its still a fun thing to learn, and its nice to be able to make cakes look a little better than before. 


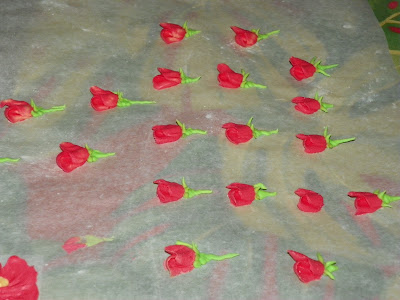
These are my rosebuds


And these are rosebuds, and primrose.  I also learned how to make Apple Blossoms.    These I put on the muffins we made for our "If you Give a Moose a Muffin" cooking activity.   I brought them to church because otherwise I'd just eat them all. 

And in the next class, we learned violets, roses and daffodils.   The leaves I learned in the first course I took.   These were put on chocolate chocolate chip cupcakes!   These got sent to church as well, everyone was pleased to see a second round of treats, and although not perfect, they were impressed with my decorating skills!


And here is Levi's next new outfit!


He always goofs around during photo shoots!
My dad purchased this fabric in Australia for me, and I thought I'd make Levi a fun outfit from it.  There was only a small amount of each of the four fabrics, so I pieced them together in a fun way.
The top is a classic button down, with flapped pockets and fun grey buttons.  
The shorts are my signature "patchy pants" which will be available for ordering from my shop soon!   They are great because you can have one pair of shorts, with lots of fun patches to match many different shirts.  Adds a colorful touch to otherwise simple shorts or pants and is a great way to add some fun to boys clothes (although these would be just as cute on a little girl!).  
To pep up the shorts, I added a free motion stitched "target" shape, it matches the design on the fabric, and Levi has been interested in bow and arrows and targets lately.     The shorts have pockets on the back, edged with some of the same fabrics. 
Pin It

If you Give a Moose a Muffin....

Pin It


We read "If You Give a Moose a Muffin" and did a quick and easy lapbook found on homeschool share. 
On the cover is a coloring page.  
Inside, first is a "M is for..." shape book, with lots of "M" words that we practiced reading
Under that is a graph we made of favorite muffin types.  Thank you facebook for making it easy to take a quick survey on the fly! 
In the middle is a wheel that spins to match clothing types with weather.  We discussed why one wears different types of clothing - pretty basic for Levi, but he liked the movable aspect of this lapbook element.
Under that is a mini tab book where Levi copied the name of the author and illustrator, and drew his own illustration.  Every time I read him any book, I try to remember to point out the Author and Illustrator, and remind Levi of their roles. 
On the right side, is a mini book of moose facts, and under that is a pocket of story sequence cards.   Levi learns a lot through auditory learning, for this, I gave him the series of cards and asked him to put them in the right order from memory (we have read this book many times).  He studied them carefully, and as he put them in order he repeated lines from the book, word for word which seemed to help him organize them.  He didn't get all of them 100% in the correct order, but pretty close, especially sense there were so many!

Nai Nai also brought him a moose shirt home from her Education conference in Canada, which was a coincidence.  She also brought us some yummy maple sugar candy, which quickly disappeared.  


 The back of the lapbook has a muffin numbers game.  I modified it so Levi would enjoy it more - first, you take a big handful of paper muffins and throw them at the plate.  Next, you count the muffins that landed on the plate, and find the matching number.  Last you read the sentience with the number ("7 yummy muffins on the plate").  I think you are supposed to nicely arrange some muffins on the plate, but for Levi, getting to throw things makes the process more fun, he even asked to play again later in the day. 


We also had a visit from some fuzzy little friends!  Levi named them "Brooke" (after his little friend who he thinks is his girlfriend), and "Cutie".  They are just starting to get their bigger feathers.  Levi had fun playing with them, and even read them a Curious George book.


We also made sushi for lunch one day.  Its actually pretty easy to do if you get the rice right (we used sushi rice, and cucumber for a filling).  We have a bamboo mat, which you can probably find at places that sell kitchen items, but you can also use a piece of plastic wrap.   There are some good directions with pictures here


Still working on our dinosaur unit study and lapbook, its mostly done, just needs to be put together.  We are now working on a Little House in the Big Woods lapbook, I found 2 really nice ones online that we are using as a starting point.  The Little House books are Levi's current favorite!
Pin It


Monday, April 9, 2012

Happy Easter!

 Nai Nai (Levi's grandma) had a birthday.  No, she didn't turn 1, we just forgot to buy candles and thats the onl'y one we could find.   I made an ice cream cake from scratch.  At the bottom is a layer of ice cream, topped by a layer of marble cake.  Part of the cake was made with coconut milk ice cream, and the cake and icing itself doesn't have any dairy so Levi could actually eat it.  

 Our local MOPS group had a kids egg hunt, it was another beautiful spring day in Florida, and the kids had a great time running across the field to find eggs.   Levi was very sweet in sharing his eggs with some of the younger kids and helping them to fill their baskets.  


We had another egg hunt after Levi's Mr. Science class.  Lucky for us, the parents agreed to a no-food hunt, so I brought chalkboard paint left over from Levi's 4th birthday party.   Its easy to make, and fun to use.  Levi wanted to draw shapes, so we used it as a quick geometry lesson.  

Magic Chalk paint: 
Small containers
corn starch
food coloring

Fill small containers with corn starch (I used the kind dips come in, with lids, but you can use any container, cup or bowl).   Add a couple drops of food coloring and shake it a little so the corn starch hides the color.  
Now for the magic!  Just add water and stir or shake to reveal the color.   Paint on sidewalks, driveways, chalkboards, and even walls and fences (outside!).   It washes away with water.  


And then we went on vacation!   We drove to the other side of Florida, to Ledo Key, near where my grandparents live and had a beach vacation.    Levi dyed eggs on the balcony, and then got to hunt for them. 
We stayed at a nice hotel right on the beach.  Levi spent his time swimming in the pool, hot tub and beach.  He also made some new friends, and the kids spent hours working on a huge sand castle.

It includes lots of pointy "drip" towers, tunnels, moats, guard towers, and even an electric fence! 


Buddy wanted to get in on the act, but Levi couldn't tear himself away from his "team" project with the other kids, so I helped him to build a small castle.  Its always been a beach holiday tradition to build a sand castle.  

Decorated with lots of shells, guard towers, and a moat!


The beaches are different than the ones by our house....


More people


But blue water


 And more shells

It was just a quick trip, but a fun family get away on the beach.  

Happy Easter!

Maine

Pin It

 Last week we learned all about Maine, another addition to our post card project.

On the front: 
State Flag of Maine, "Where in the United states?" mini book, and the state quarter.  

 On the back is a lighthouse, labeled with all of the parts of a lighthouse.   We spent some time looking at photos of real lighthouses and comparing them, noting their similarities.  We also discussed what lighthouses are for.    To demo the concept, we used a dark room for night time, a flashlight to represent the light house, a box for a ship, and pillows for rocks.   The ship crashed into the rocks without the lighthouse to guide it!

Inside:
Left side has a Maine layer book, a map of Maine, and a coloring book page showing some things found in Maine including the state bird and tree, a map, and a lobster (if we weren't vegetarian, that would have been a fun cooking lesson)
Middle: our Main postcards - we got 2 of them and they both happened to have maps on them!  They also have lots of tiny pictures of all kinds of things found in Maine.  We spent a long time studying these.
The folded page is a compound word worksheet.   "Lighthouse" is a compound word, so that led us to explore other compound words and practice writing them and saying each part of the word.
The boat cards show all kinds of different boats, because there are a lot of boats in Maine!  We used these for various activities: classifying and sorting boats by size, mode of propulsion, function, etc. 
Right: Map of Maine (lots of maps this time), showing the state capital, Augusta.
And a Maine geography activity.  We looked at a map and learned how to use the compass to determine North South East and West


And lastly, is Levi's moose!  The antlers were supposed to be oak leaves, but he chose these from a bush in front of our house.  Levi it out on his own, and then decided to make it into a mask by adding eye holes. 
Pin It